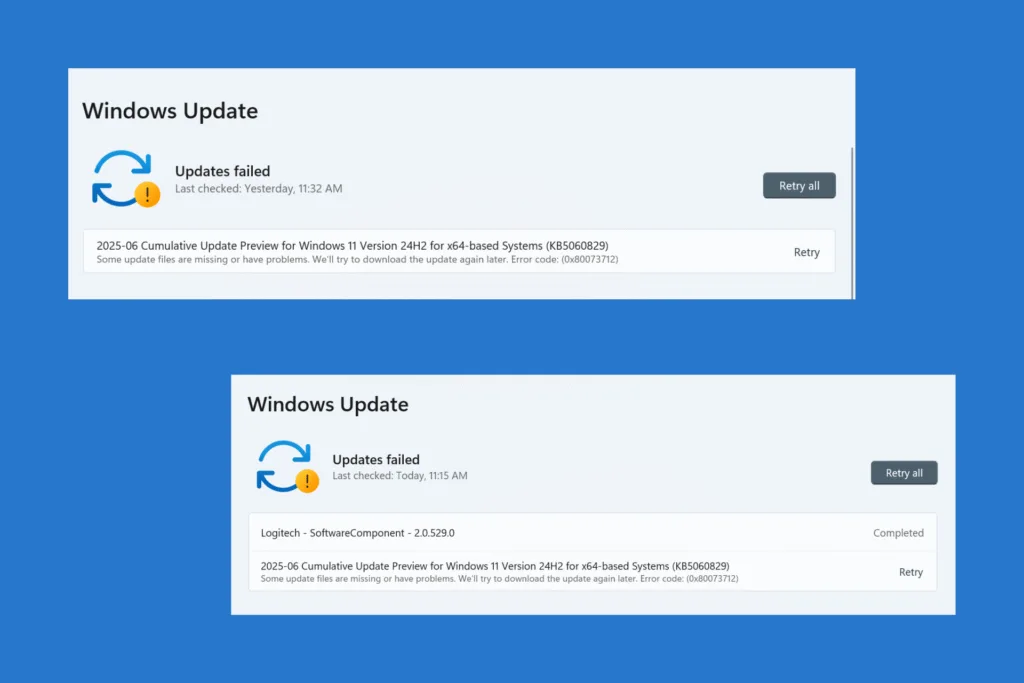
I recently faced the 0x80073712 update error on Windows 11 while installing the KB5060829 update. Even after several attempts, the update failed at the installation stage. The download would complete, followed by installation reaching 100%, but then it would instantly show the 0x80073712 error.
Surprisingly, optional updates, like new driver versions, were installing fine during the period. This led me to conclude that the problem lies with the Windows update infrastructure, since only OS-related updates were affected. And based on this information, I proceeded with troubleshooting the 0x80073712 update error in Windows!
How can I fix the 0x80073712 update error in Windows?
1. Reset the Windows update components
The easiest fix for any Windows update error is to reset the Windows update components. These components are responsible for handling the download and installation of OS-related updates, and if these are corrupted or broken, your PC may fail to install updates.
To reset the Windows update components,
- Press Windows + S to open Search, type Command Prompt, and click on Run as administrator.
- Click Yes in the UAC prompt.
- Paste the following commands and hit Enter after each to stop services related to Windows updates:
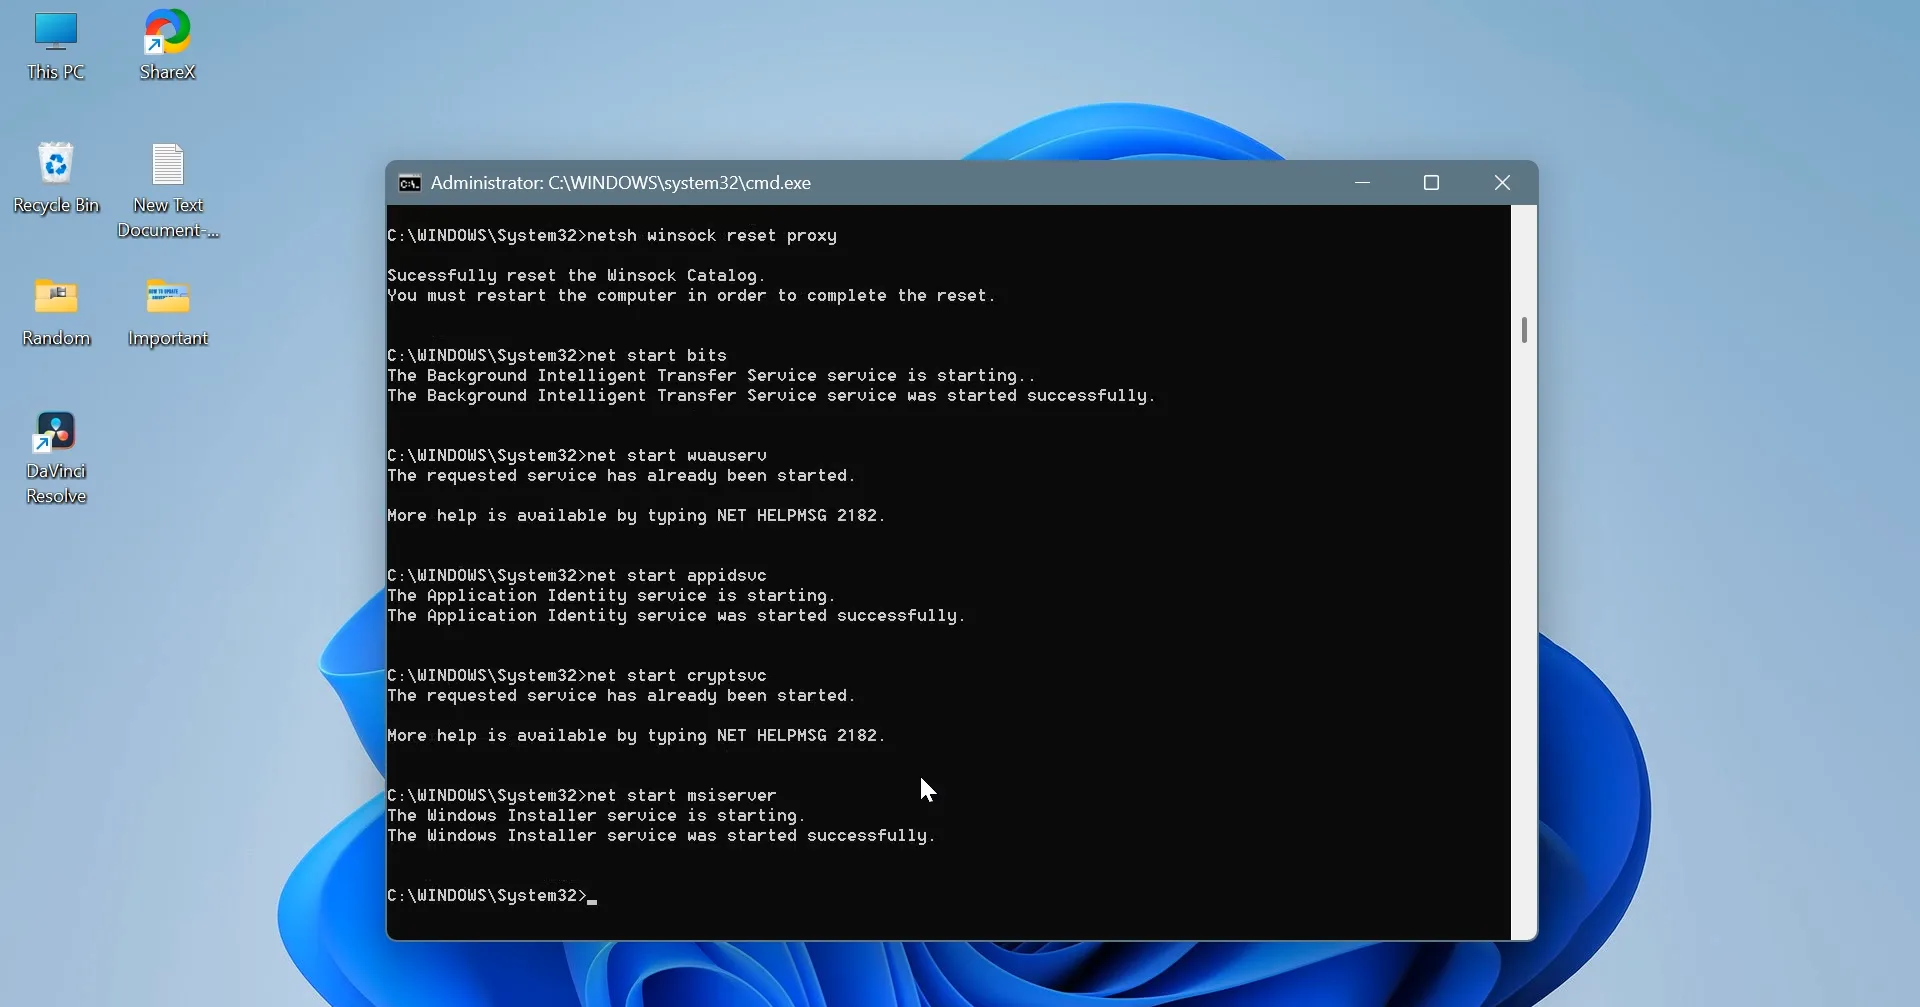
net stop bitsnet stop wuauservnet stop appidsvcnet stop cryptsvc - Now, run this command:
Del "%ALLUSERSPROFILE%\Application Data\Microsoft\Network\Downloader*.*" - Next, run these two:
rmdir %systemroot%\SoftwareDistribution /S /Qrmdir %systemroot%\system32\catroot2 /S /Q - Run these commands to reset the BITS and Windows Update service:
sc.exe sdset bits D:(A;;CCLCSWRPWPDTLOCRRC;;;SY)(A;;CCDCLCSWRPWPDTLOCRSDRCWDWO;;;BA)(A;;CCLCSWLOCRRC;;;AU)(A;;CCLCSWRPWPDTLOCRRC;;;PU)sc.exe sdset wuauserv D:(A;;CCLCSWRPWPDTLOCRRC;;;SY)(A;;CCDCLCSWRPWPDTLOCRSDRCWDWO;;;BA)(A;;CCLCSWLOCRRC;;;AU)(A;;CCLCSWRPWPDTLOCRRC;;;PU) - Run this command next to change the directory and enter the System32 folder:
cd /d %windir%\system32 - Execute these commands individually (paste one and hit Enter after it) to re-register the DLL files critical to Windows update:
regsvr32.exe /s atl.dllregsvr32.exe /s urlmon.dllregsvr32.exe /s mshtml.dllregsvr32.exe /s shdocvw.dllregsvr32.exe /s browseui.dllregsvr32.exe /s jscript.dllregsvr32.exe /s vbscript.dllregsvr32.exe /s scrrun.dllregsvr32.exe /s msxml.dllregsvr32.exe /s msxml3.dllregsvr32.exe /s msxml6.dllregsvr32.exe /s actxprxy.dllregsvr32.exe /s softpub.dllregsvr32.exe /s wintrust.dllregsvr32.exe /s dssenh.dllregsvr32.exe /s rsaenh.dllregsvr32.exe /s gpkcsp.dllregsvr32.exe /s sccbase.dllregsvr32.exe /s slbcsp.dllregsvr32.exe /s cryptdlg.dllregsvr32.exe /s oleaut32.dllregsvr32.exe /s ole32.dllregsvr32.exe /s shell32.dllregsvr32.exe /s initpki.dllregsvr32.exe /s wuapi.dllregsvr32.exe /s wuaueng.dllregsvr32.exe /s wuaueng1.dllregsvr32.exe /s wucltui.dllregsvr32.exe /s wups.dllregsvr32.exe /s wups2.dllregsvr32.exe /s wuweb.dllregsvr32.exe /s qmgr.dllregsvr32.exe /s qmgrprxy.dllregsvr32.exe /s wucltux.dllregsvr32.exe /s muweb.dllregsvr32.exe /s wuwebv.dll
9. Now, execute these two commands to reset the network setup:netsh winsock resetnetsh winsock reset proxy
10. Finally, run these commands to restart the services you stopped earlier:net start bitsnet start wuauservnet start appidsvcnet start cryptsvc
11. Once done, restart the computer and check for improvements.
If resetting Windows update components sounds too complex to you, remember, there’s no easy way out. And frankly, this is the most effective solution for the 0x80073712 Windows update error, working in almost 3 out of 5 cases!
2. Repair the corrupted system files
Often, corrupted system files can prevent Windows updates from functioning, resulting in delays or unexpected error codes. To fix this, you must run the SFC (System File Checker) scan and the DISM (Deployment Image Servicing and Management) tool.
To do that,
- Press Windows + S to open Search, type Command Prompt, and click on Run as administrator.
- Click Yes in the UAC prompt.
- Paste the following three DISM commands individually and hit Enter after each:
DISM /Online /Cleanup-Image /CheckHealthDISM /Online /Cleanup-Image /ScanHealthDISM /Online /Cleanup-Image /RestoreHealth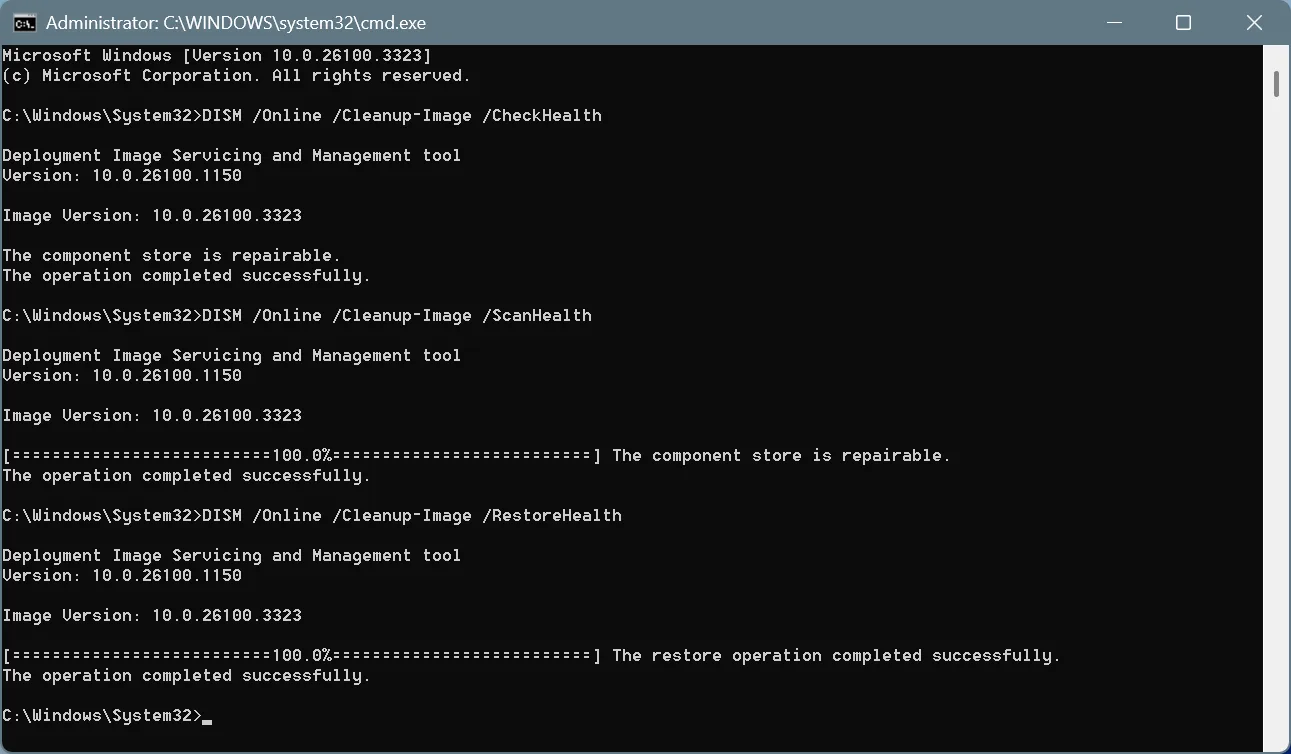
- Now, run this command for the SFC scan:
sfc /scannow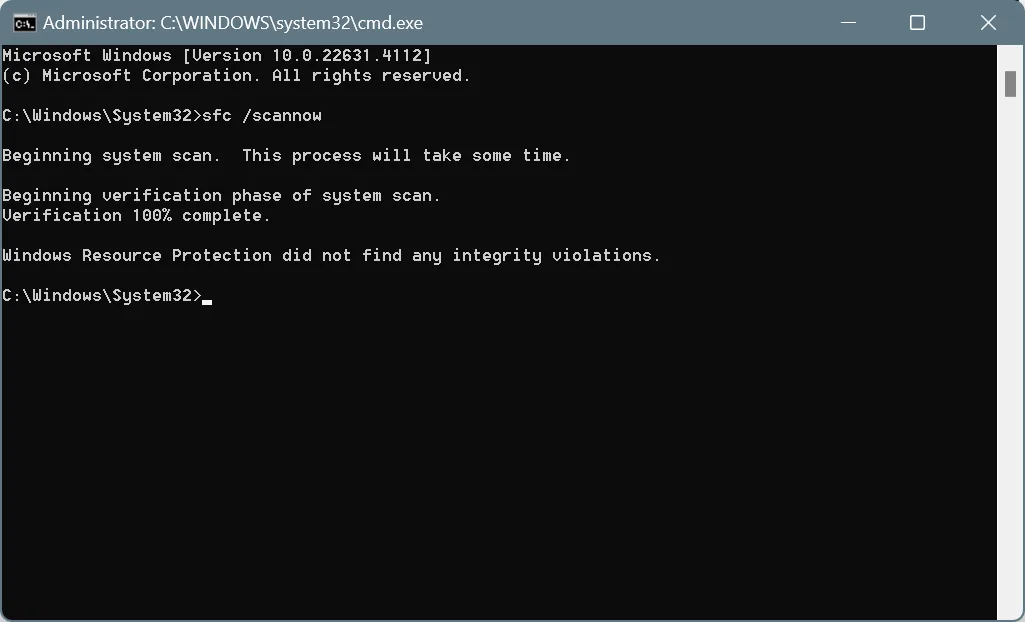
- Finally, reboot the PC to apply the changes, and verify whether the 0x80073712 Windows update error is fixed.
Remember, this wouldn’t work when the file corruption is severe. In that case, you will have to either perform an in-place upgrade or reset Windows to factory defaults!
3. Run Disk Cleanup
Next up, we will use Disk Cleanup to delete corrupted files related to Windows updates and other system processes. While resetting Windows update components deletes some of these files, it doesn’t target Windows upgrade log files, a key reason behind the 0x80073712 update error in Windows 11.
To use Disk Cleanup,
- Press Windows + S to open Search, type Disk Cleanup, and click on Run as administrator.
- Select the system drive (usually C:) from the list, and click OK.

- Once Disk Cleanup calculates the storage that can be freed up, tick the checkboxes for Windows Update Cleanup and Windows upgrade log files, in addition to any that are already selected, and click OK.

- Click on Delete Files in the confirmation prompt.

- Once done, restart the PC and verify whether Windows can now install the update that was earlier throwing the 0x80073712 error.
4. Manually install the affected update
Did you know you can manually install all newer versions available via Windows Update through the Microsoft Update Catalog, a website that hosts all these updates? It’s a simple process, akin to installing a new program on your PC. To do that,
- Open a browser, go to Microsoft Update Catalog, and search for the update that’s throwing an error during installation.

- Now, click the Download button next to the version that’s compatible with your PC. For instance, you will need the x64 version for 64-bit Windows and the ARM64 version for ARM-based Windows.

- In the browser window that opens, click on any link to initiate the download.

- Once the update is downloaded, run it, follow the on-screen instructions, and wait for the installation to complete. It may take a few minutes.

- Finally, restart the computer for the changes to fully come into effect.
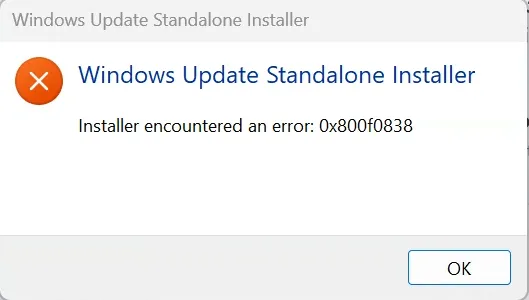
I would like to point out that while manually installing Windows updates has always worked for me, I ran into an error this time around, likely due to heavy corruption in the system files, update components, or Windows itself. The error message read “Windows Update Standalone Installer. Installer encountered an error,” and the error code was 0x800f0838.
So, I knew I had to move to advanced troubleshooting to fix issues with Windows updates!
5. Perform a system restore
The very first thing I did was perform a system restore. In most cases, this can quickly fix misconfigurations and eliminate software-based conflicts in Windows. All you need is a restore point created before the error first appeared. If you are unsure of the steps, check our video tutorial on performing a system restore in Windows.
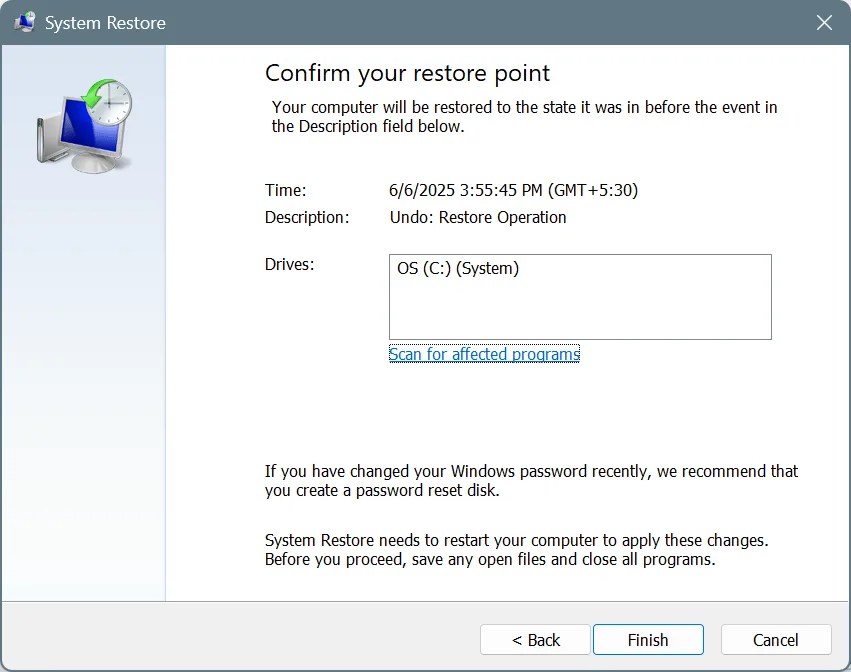
In the unlikely event that a system restore causes further issues, you can always undo a system restore.
Surprisingly, this, too, didn’t work for me, and I moved over to the next solution!
6. Perform an in-place upgrade
Next up, I performed an in-place upgrade. It’s akin to reinstalling Windows, but your files and installed apps remain unaffected. I have done it on several instances, and every time, it has successfully resolved the issue. But an in-place upgrade didn’t work this time, most likely due to heavy file corruption in the Windows update components. Even the Windows update history didn’t load!
When performing an in-place upgrade, I got the following error:
We couldn't install Windows 11.

We've set your PC back to the way it was right before you started installing Windows 11.

0x8007000D - 0x20009
The installation failed in the SAFE_OS phase with an error during PREPARE_ROLLBACK operation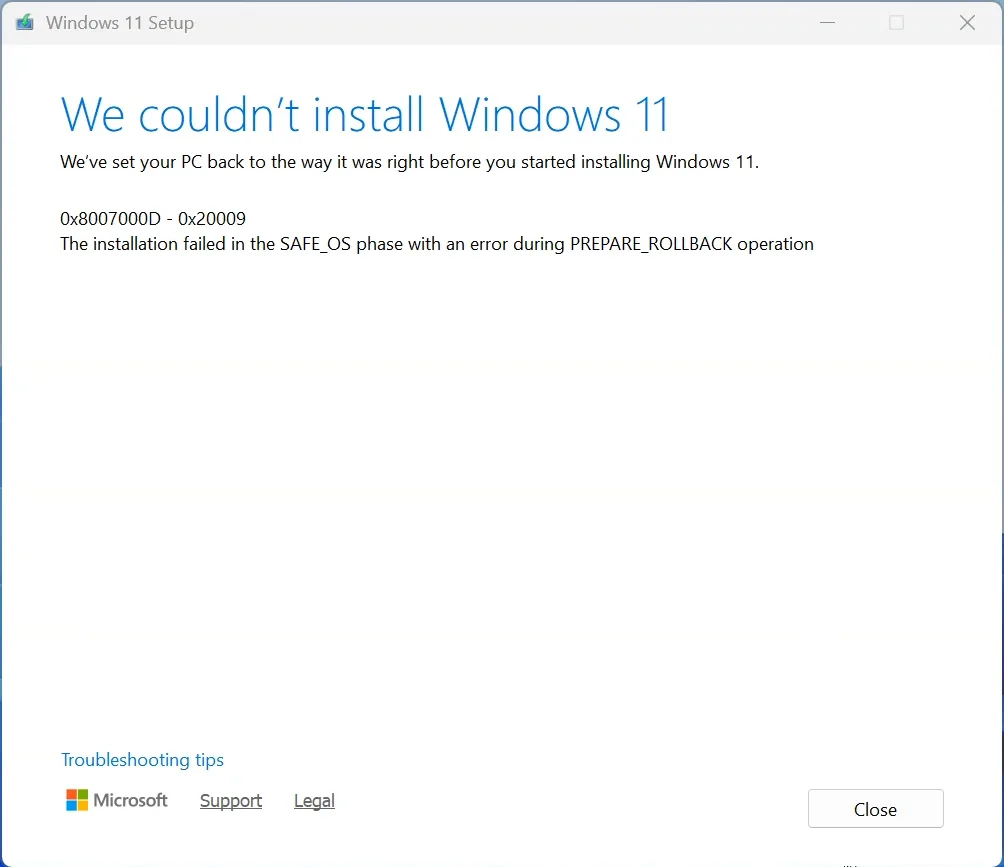
When an in-place upgrade fails, you have no other option to fix Windows except for a complete reset. And that’s what I did next!
7. Reset Windows to factory defaults
I used the built-in settings to reset Windows to factory defaults, since that’s safer compared to a reinstall. Between Cloud Download and Local Reinstall, I picked the former, given there was heavy corruption within the existing system files, and using those for a reinstall could lead to more problems.
If you are unsure of the steps, check out our video tutorial on resetting Windows without data loss!
After performing the reset, it took me a few hours to set up the PC, i.e., download the apps that were uninstalled during the process and reconfigure the settings. But a reset did fix the 0x80073712 Windows update error. When I then tried installing the KB5060829 post-reset, it installed fine, without throwing any errors.

At this point, I would like to clarify that while resetting Windows worked for me, it’s not the first thing you should do. Start with the solutions listed first, and when none work, proceed with the reset. Because, after a reset, you will have to reconfigure the PC. And that will take at least an hour!
Before you leave, find out how to speed up Windows and make your PC run faster than ever!
For any queries or to share which fix worked for you, drop a comment below.

With over five years of experience in the tech industry, Kazim excels at simplifying complex topics, making them accessible to tech enthusiasts and general readers alike. He has contributed to several renowned publications worldwide, including WindowsReport and Allthings.how, bringing insightful coverage of key developments in the field.
Kazim has extensively covered the Windows ecosystem, from the early days of Windows 7 to Windows 11. Unlike many in the field, he’s optimistic about Windows 11, calling it the most user-oriented iteration to date.
When he’s not writing, you’ll find Kazim planning weekend getaways or diving into tech verticals beyond his expertise.