Does your Windows PC only have the C: drive, where all the data, whether it’s for Windows or your personal files, is crammed up together? If so, it’s time to partition the hard drive (or SSD) in Windows. Believe me, the process sounds complex, but it would take less than 10 minutes to partition the existing drive and create more volumes.
Before we proceed to the actual steps, check the available storage on the existing drive and identify how much of it you want to allocate to the new partition(s).
Yes, you can have 3-4 partitions on Windows without running into any issues, but create only as many as you need. Having a higher number of partitions doesn’t help. On the other hand, it can be detrimental to the system performance and your Windows experience!
How do I split my hard drive into partitions without losing data?
The steps to partition an HDD and SSD are identical. So, irrespective of the type of storage drive on the PC, follow the steps listed below to create more volumes in Windows 10 and Windows 11.
1. Using Disk Management
The easiest way, and one most of you would be comfortable with, to partition a hard drive in Windows and create more volumes is via Disk Management, a built-in utility that helps manage all disk-related tasks. The reason I prefer this method is because of its simplicity. You don’t have to juggle between a bunch of apps, no complex scripts are involved, and the entire process takes less than 5 minutes!
To do that:
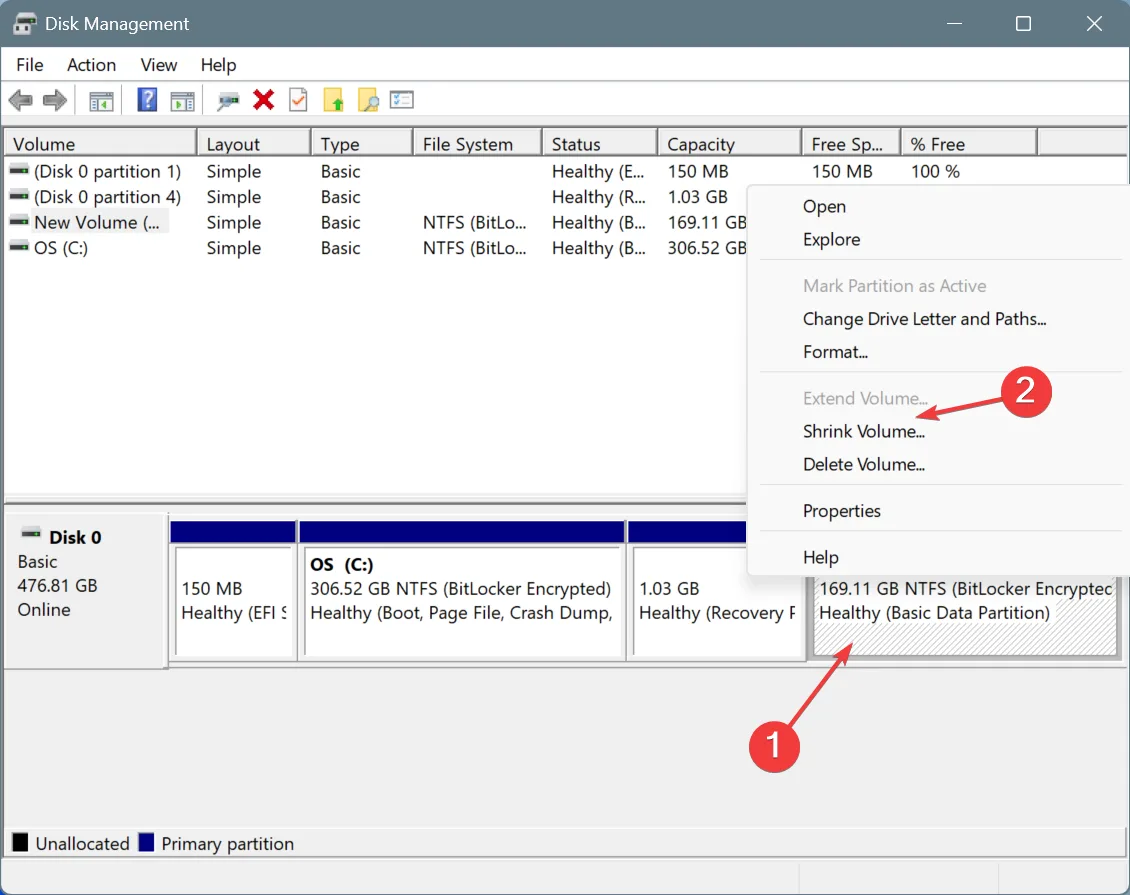
- Press Windows + X and select Disk Management.
- Right-click on the volume that you want to downsize to allocate space for the new partition, and select Shrink Volume.
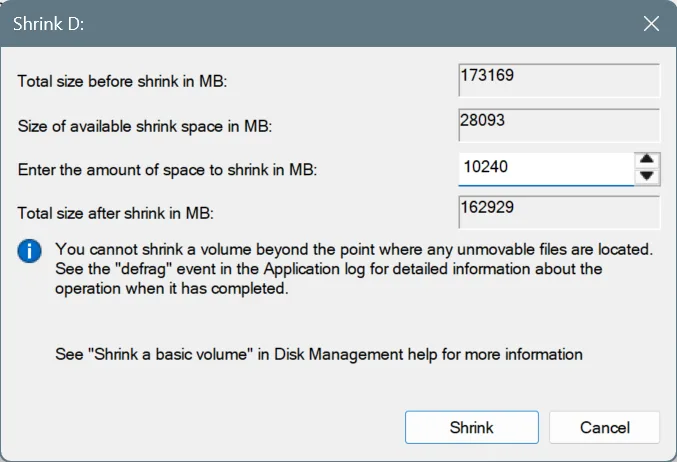
- Enter the size that you want to free up for the new partition in MB (Megabytes), and click on Shrink. Allocate sufficient storage space to the new partition, while not shrinking too much from the existing partition, especially if it’s the one storing Windows’ files, usually the “C:” drive.
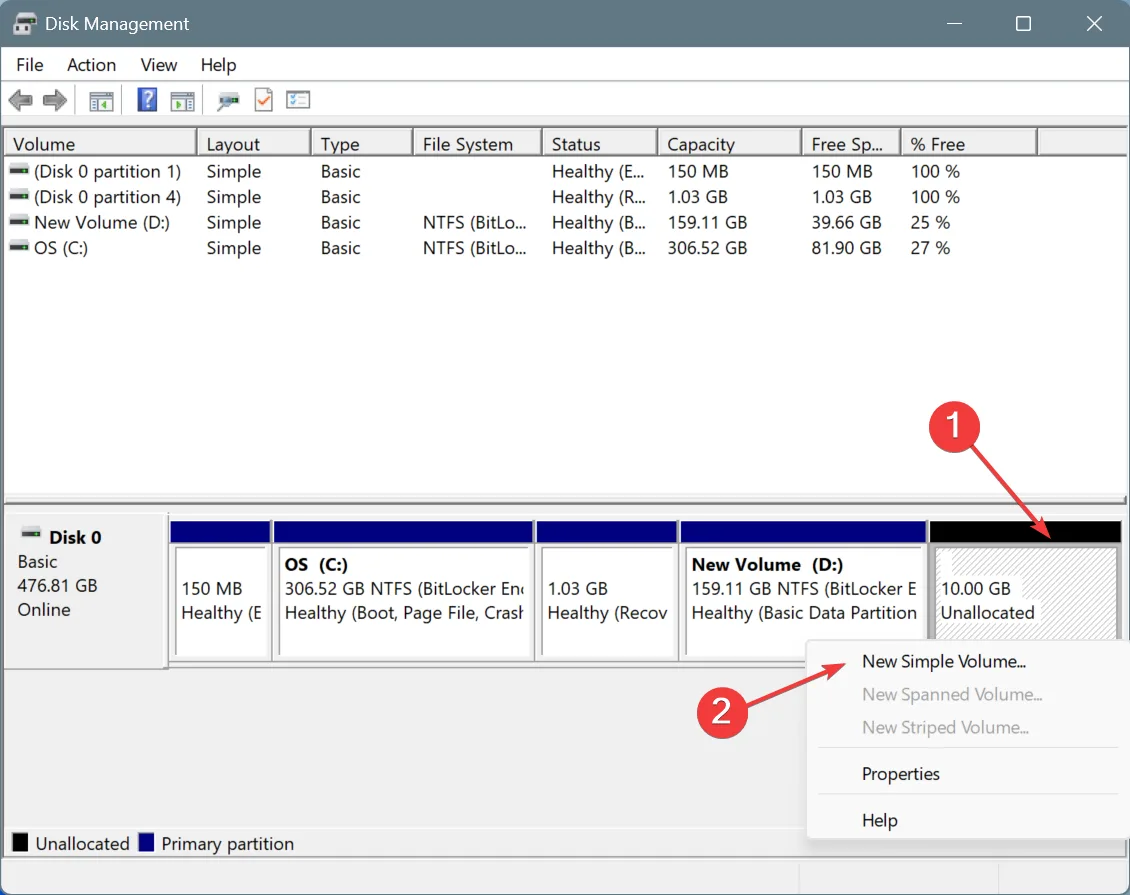
- You should now see the freed-up space with a black bar at the top. This indicates that it hasn’t been partitioned yet. To do that, right-click on the space and select New Simple Volume.
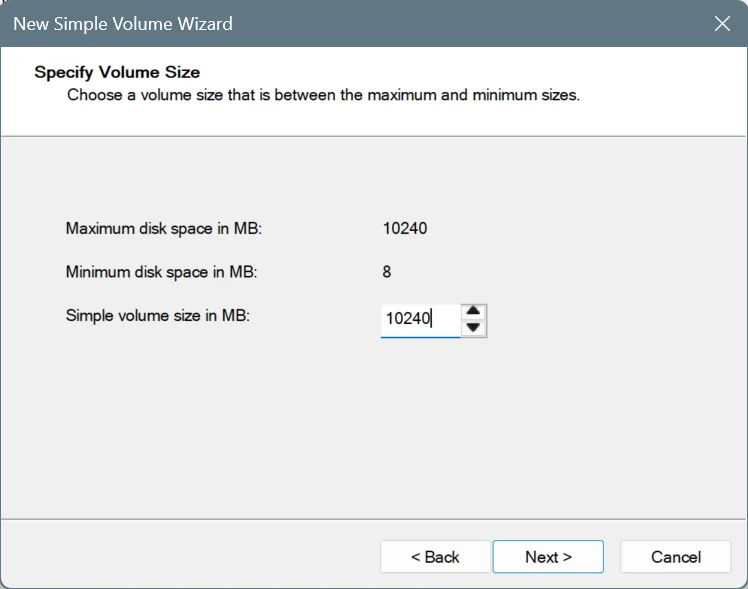
- Click Next to proceed.
- If you plan on creating only one new partition, enter the entire freed-up space in the text field and click Next. This is the same as the “Maximum disk space in MB” mentioned above. Or in case you want to create more partitions, only enter the space you wish to allocate to this one. You can then follow the same steps and create more partitions on the leftover unallocated storage.
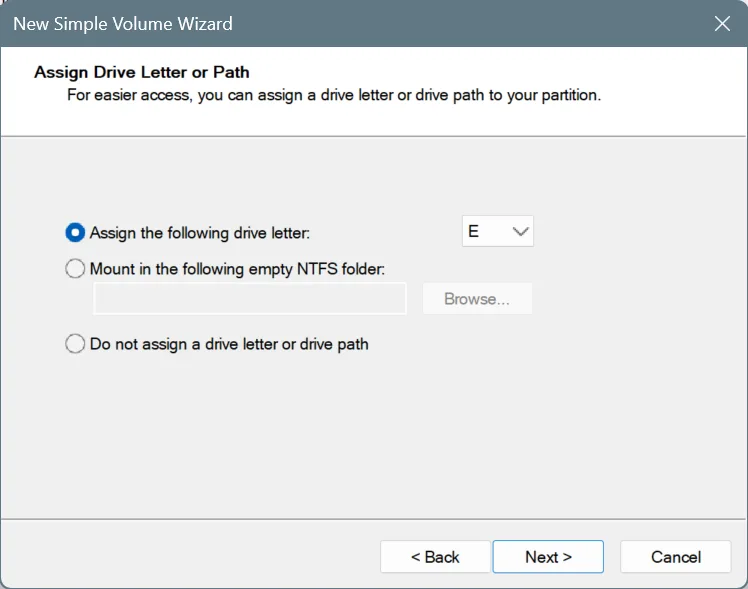
- Next, assign a drive letter to the drive. I recommend going with the default selection here. Remember, it’s vital to assign a drive letter to each partition. In the absence of it, the volume won’t show up in the File Explorer.
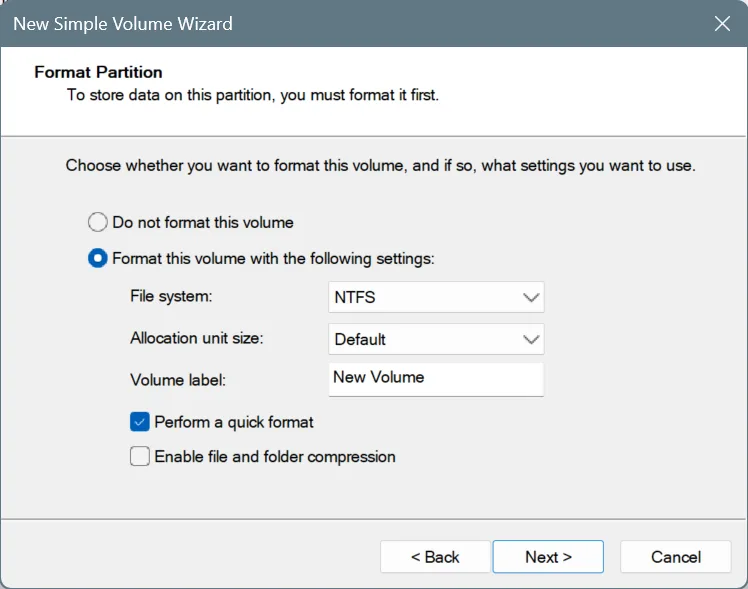
- Next, configure the file system, allocation unit size, and volume label. For the file system, go with NTFS due to its performance. As for FAT32, it offers compatibility with a wider range of devices. I again recommend going with the default settings here.
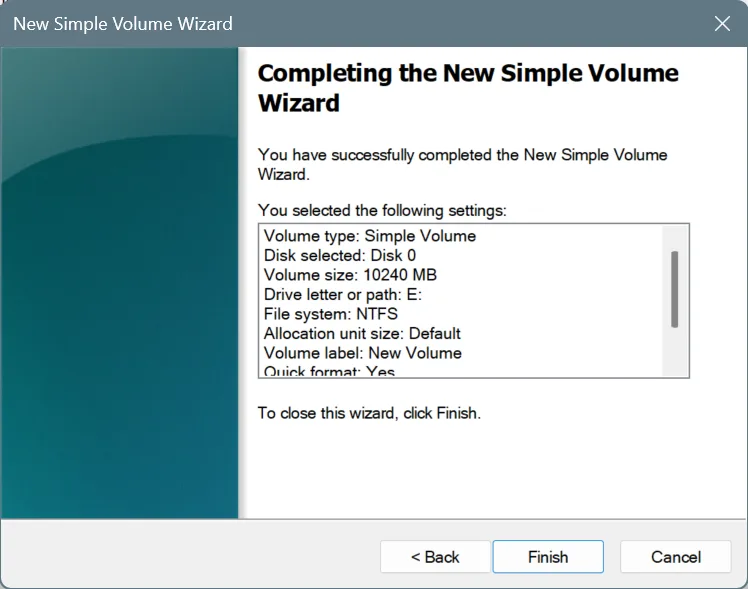
- Finally, verify the selected settings for the new partition, and click Finish to create it.
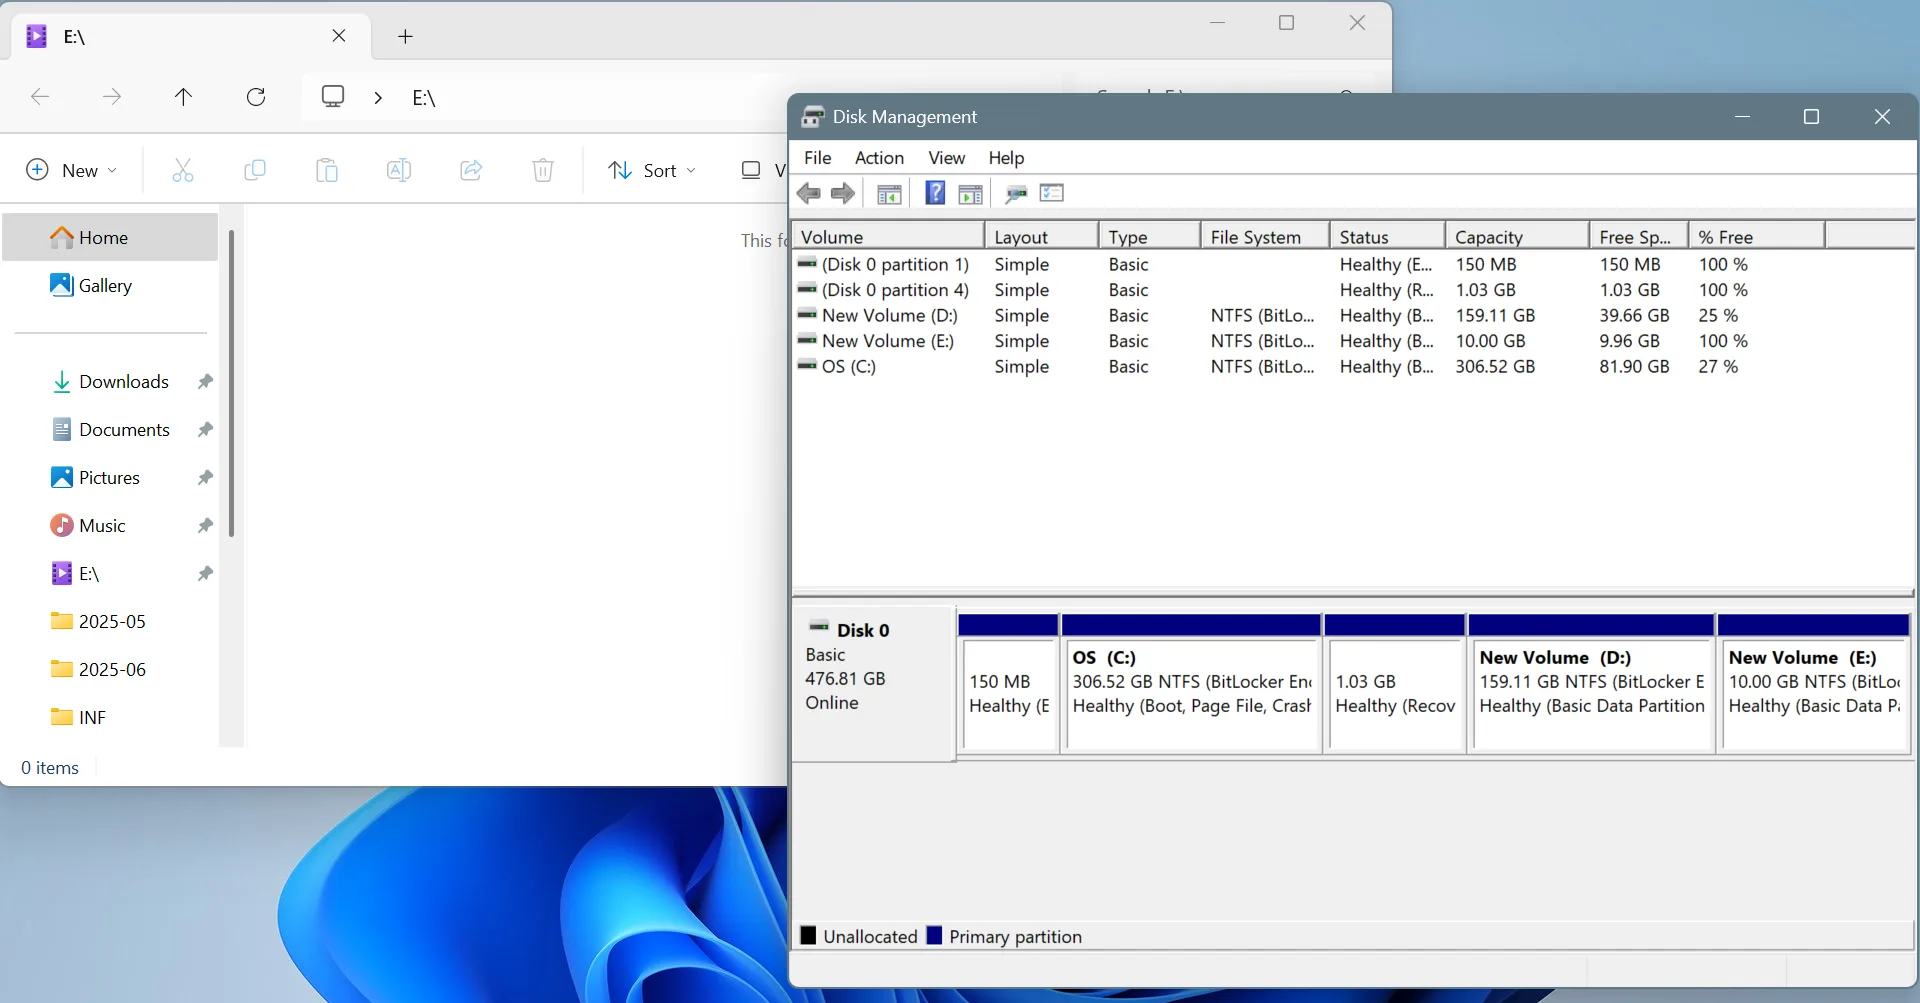
- Windows will automatically launch the new partition/volume in File Explorer. It will also be listed in Disk Management, alongside the other pre-existing volumes.
Here are a few key points to remember:
- Don’t create too many partitions on the drive if you cannot allocate enough storage to each, especially the system drive, i.e., the one storing Windows.
- If a partition doesn’t show up in File Explorer, it most likely isn’t formatted or hasn’t been assigned a drive letter yet.
- For regular users, it’s best to go with Windows’ recommended settings when creating a new partition on the hard drive.
2. Using Diskpart via Command Prompt
If you like to use the Command Prompt to handle Windows-related tasks, the Diskpart utility comes to aid in partitioning an HDD or SSD in Windows. Remember, this method is only for users comfortable with the Command Prompt. Unlike Disk Management, which displays warnings, there isn’t any scope for mistakes here. If you make one, the stored data on the partition may get deleted!
If you wish to continue, here’s how you can create a new partition on a drive in Windows:
- Press Windows + S to open Search, type Command Prompt, and click on Run as administrator.
- Click Yes in the UAC prompt.
- Paste the following command and hit Enter to run the Diskpart utility:
diskpart
- Run this command to view available disks:
list disk - Execute this command to select the disk that you want to work on. Make sure to replace X with the number assigned to that disk:
select disk X - Now, run this command to view existing volumes on the disk:
list volumes - Next, run this command to select the volume that you want to shrink and create space for the new partition. Make sure to replace Y with the number assigned to that volume:
select volume Y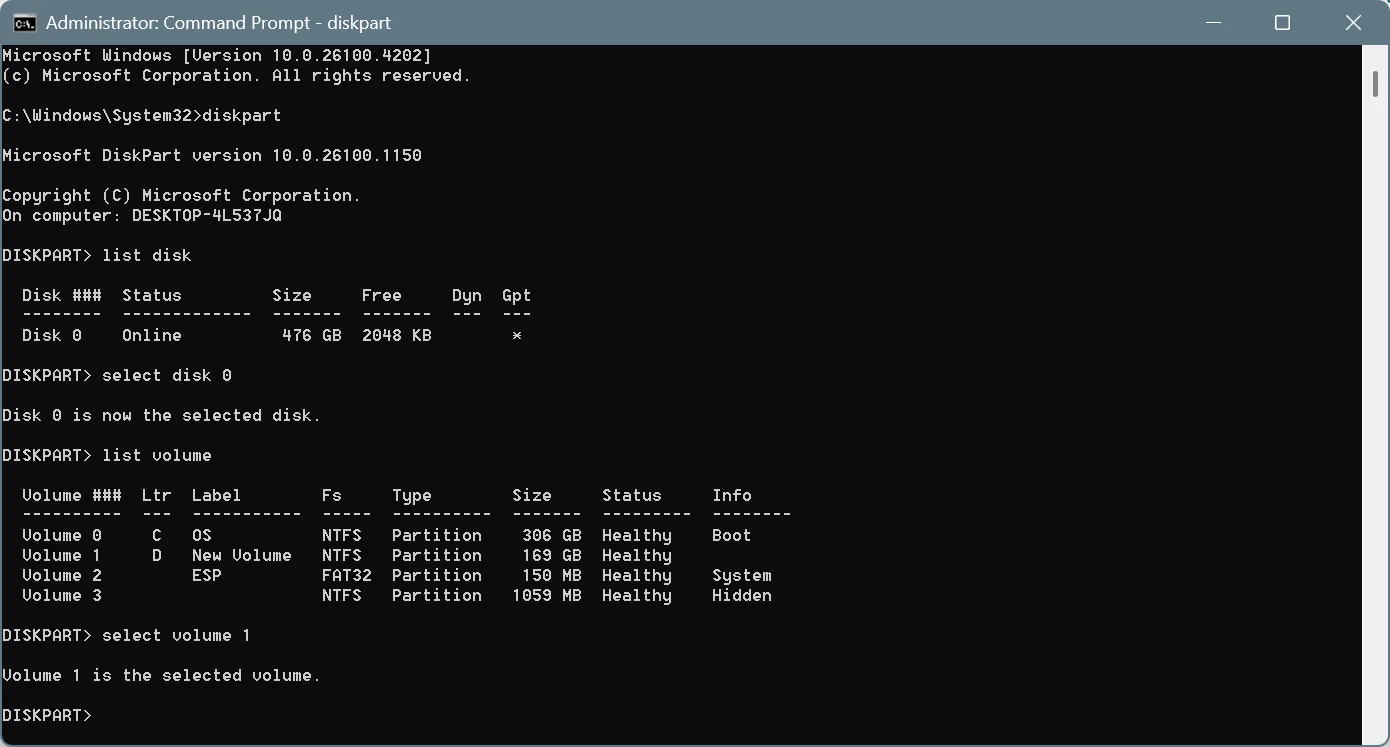
- Execute this command to shrink space on the drive. While I am shrinking 10 GB (10240 MB), you can go with a higher number. Make sure to enter that figure in MBs:
shrink desired=10240 - Next, run this command:
list disk - Execute this command and select the same disk that you have been working on all this time:
select disk X - Run this command to create a primary partition on the unallocated space:
create partition primary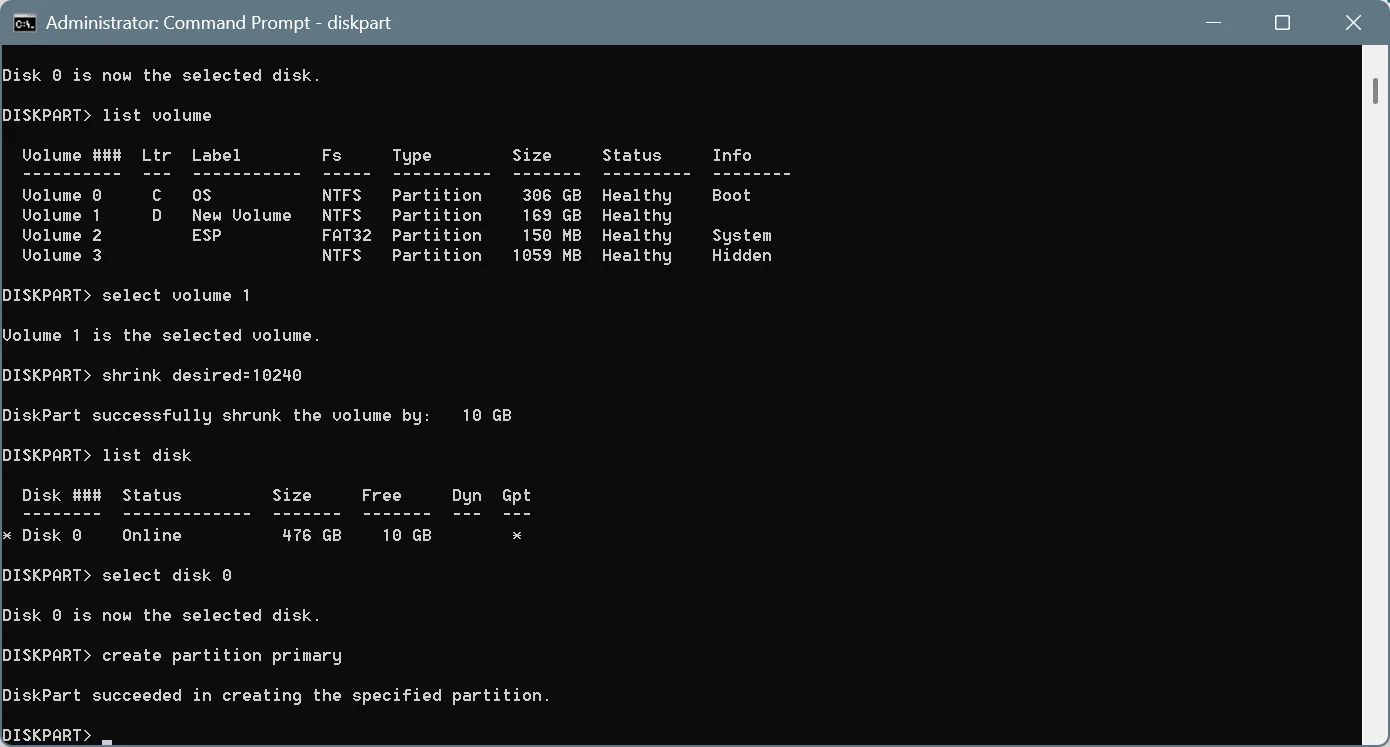
- Now, run this command to quickly format the drive using the NTFS file system:
format fs=NTFS quick - Finally, run this command to assign a new, unassigned drive letter to the partition:
assign letter=E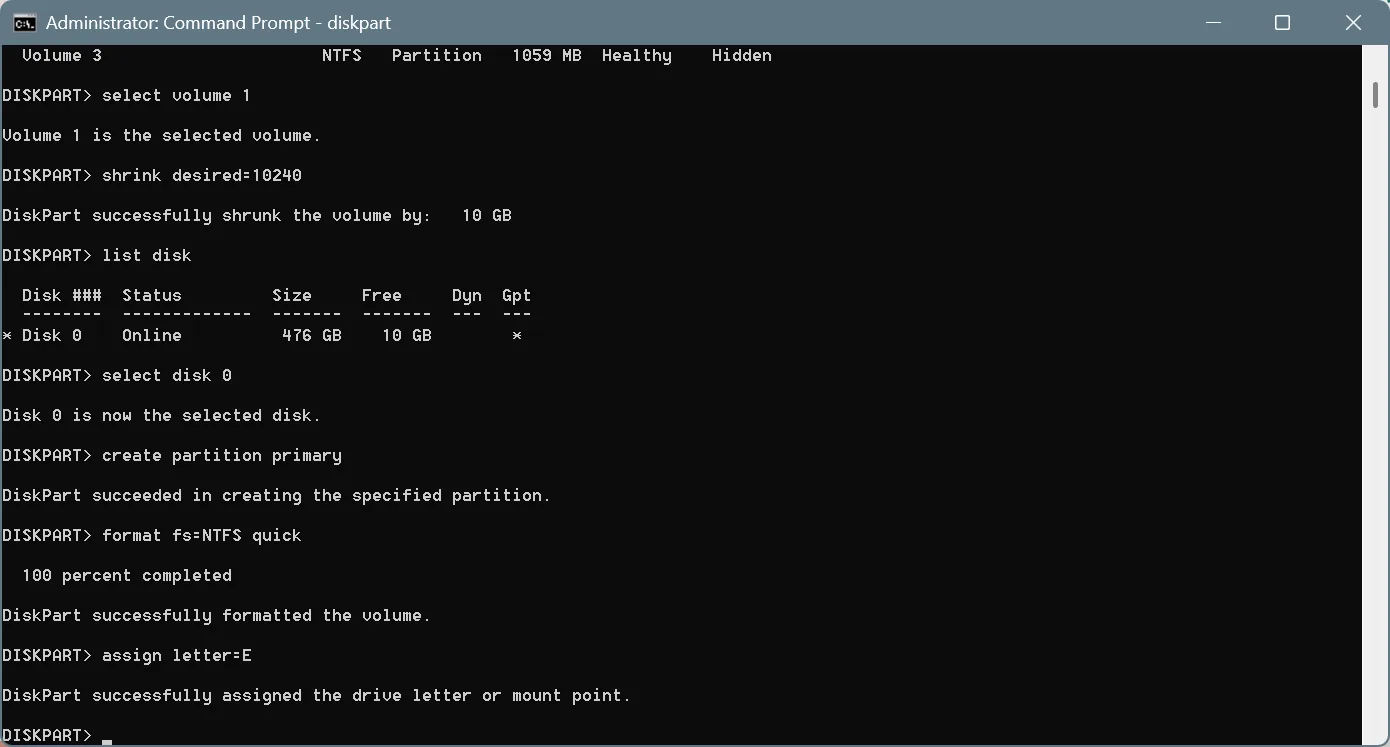
- If you have done everything correctly so far, the new partition should open up in File Explorer.
3. Using a third-party tool
As you can see, Windows offers two built-in ways to partition a hard drive and create more volumes on it. But some people still opt for third-party software. I am not entirely against the idea, since there are a few limitations in Windows. For instance, you can’t rearrange or move an unallocated space using Disk Management.
Benefits of using a third-party tool for partitioning Windows are:
- Allows you to rearrange the position of the unallocated space. This way, you can allocate the space to any existing drive and not only the one listed right before it.
- Cleaner, simpler interface.
- More warnings and recommendations to streamline the process and prevent future issues.
As for which third-party tools you should go for, I recommend GParted and AOMEI Partition Assistant.
WindowsExplained earns no commission from the products listed here. They are included solely for their effectiveness!
Can I partition an existing hard drive?
Yes, you can partition an existing hard drive in Windows without data loss. Moreover, you don’t need to rely on third-party software for the job. Windows offers built-in utilities to handle the task.
Should I create more partitions in Windows?
Creating partitions in Windows has benefits, but only to a certain extent. It does improve data management and handling, and allows you to separate personal stuff from Windows’ files.
Although when you increase the number of partitions, it adds complexity to the setup, which may lead to errors. Besides, on modern-day storage drives, both HDDs and SSDs, creating more partitions doesn’t improve the performance of Windows!
In my experience, a two-partition setup is the best. The “C:” drive should be used for Windows’ files, while on “D:“, you can have all other personal and non-critical stuff that doesn’t need to be stored on the system drive.
You now know how to partition a hard drive in Windows and all that there is to know on the subject. If you are still not confident, I suggest backing up the files before proceeding with partitioning the drive. Of course, if you have any queries, drop them in the comments section, and we will answer them right away!
Before you leave, discover expert tips to increase the Internet speed in Windows.

With over five years of experience in the tech industry, Kazim excels at simplifying complex topics, making them accessible to tech enthusiasts and general readers alike. He has contributed to several renowned publications worldwide, including WindowsReport and Allthings.how, bringing insightful coverage of key developments in the field.
Kazim has extensively covered the Windows ecosystem, from the early days of Windows 7 to Windows 11. Unlike many in the field, he’s optimistic about Windows 11, calling it the most user-oriented iteration to date.
When he’s not writing, you’ll find Kazim planning weekend getaways or diving into tech verticals beyond his expertise.