If you are using an old Windows PC, chances are that its performance has degraded over time, resulting in longer loading times, frequent lag, and brief black screens when running resource-intensive applications. All of that can be eliminated if you speed up Windows!
The best part, you don’t need a third-party tool for it. All the features offered by a PC optimization program are available by default within Windows.
I have two Windows laptops, a Dell 2-in-1 (16 GB RAM) and an old HP device (8 GB RAM). After applying the tips listed below to both, I witnessed a massive improvement. The HP laptop, which had gotten awfully slow over the last 10 years, displayed an instant boost in performance. Of course, the results will be different for every one of you, depending upon what’s slowing down your PC.
What causes a Windows PC to slow down?
- Power-saving settings and configuration
- Too many active apps and processes
- Malware or virus
- Outdated OS and drivers
- Low available RAM
- Low available disk space
- Outdated or faulty hardware
Can I make an old Windows PC run fast? Yes, you can speed up an old Windows PC by adding more RAM and installing Windows on an SSD. If that’s not an option, consider increasing the page file size and setting up ReadyBoost!
How do I make my Windows PC run faster?
While listing methods underneath, I have prioritized the simpler and easily executable ones. If you have already checked other online resources, take a quick glance at the first 10 and start from #11. That’s where the real magic starts!
Also, the steps might be slightly different if you are running an older Windows version or iteration. I am using a Windows 11 PC running the 24H2 version of the OS. Although the results will be similar.
1. Switch to a high-performance power plan
The easiest way to speed up Windows is to enable the high-performance power plan. It’s available in the Power settings. When you are on a high-performance power plan, Windows prioritizes the PC’s speed over battery life. Subsequently, more resources are allocated to the active processes.
- To enable the high-performance power plan, press Windows + I to open Settings > go to System > click on Power & battery > expand the Power mode entry > select Best performance for both Plugged in and On battery.

Check how this works out. Ideally, you should see an instant boost in Windows performance. If not, there’s another hidden option for an even greater boost, the “Ultimate Performance” power plan. The “Ultimate Performance” plan allows the PC hardware to take up as much resources as needed, thus improving performance (at the cost of battery life).
How do I enable the Ultimate Performance power plan in Windows?
- Press Windows + S to open Search, type Control Panel > select the relevant result > click on System and Security > click on Power Options > click on Show additional plans > select Ultimate Performance > reboot the PC to fully apply the changes.

- If the Ultimate Performance power plan is not listed, press Windows + S to open Search > type Command Prompt > click on Run as administrator > click Yes in the UAC prompt > paste the “powercfg -duplicatescheme e9a42b02-d5df-448d-aa00-03f14749eb61” command > hit Enter > restart the PC > head back to Power Options > select Ultimate Performance.

Remember, on newer versions of Windows 11, the Ultimate Performance power plan doesn’t show up even after running the command. If you, too, are affected by it, just switch to the Best Performance plan and try the tips listed next. I wouldn’t recommend you create a custom plan at this point!
2. Disable search indexing
Under default settings, Windows builds an index of files stored on the PC using the Search Indexer service (Process Name: SearchIndexer.exe). This is used to quickly present the results when you perform a search. But this regular indexing takes up significant system resources on older PCs with a bare-minimum configuration. And disabling Search Indexing will speed up Windows!
- To disable Search Indexing on Windows, press Windows + S to open Search > type Services > click on the relevant result > scroll down the list, right-click on Windows Search > select Properties > choose Disabled from the Startup type dropdown menu > click on Stop under Service status > click Apply and OK to save the changes.

Disabling the Windows Search service will turn off content indexing across the PC!
- If you want to exclude only specific folders or directories from indexing, press Windows + S to open Search > type Indexing Options > click on the relevant result > click the Modify button > untick the checkbox for a folder or expand a drive and uncheck specific directories under it > click OK to save the changes.

3. Uninstall unused apps
Another trick to speed up Windows and make it faster is to uninstall unused apps or the ones that you rarely use. These could be file conversion software, document viewers, games, gaming clients, or productivity programs. Often, these categories of apps take up the maximum resources.
- To uninstall an app, press Windows + S to open Search > type Control Panel > click on the relevant result > click on Uninstall a program > select the unused app(s) > click Uninstall > follow the on-screen instructions to complete the removal.

Some apps leave behind files post-uninstallation, which will take up storage space on your PC. Whether or not storage space is a problem, you should find and delete these files, since they no longer serve a purpose. (Steps for deleting leftover files are explained under #7)
4. Disable non-critical services and startup apps
Do you know what actively consumes the most resources on a Windows PC? It’s the background services and the apps loaded at startup, many of which are not even required for the basic functioning of the computer.
For instance, the Acrobat Update Service automatically runs on boot on PCs that have any Adobe Acrobat software installed. Its job is to look for software updates and install them, but the same task can be done manually by the user. So, having it running in the background is a waste of PC resources.
So, I recommend performing a clean boot on Windows. It basically loads your PC with the bare minimum services, drivers, and apps, i.e., only the absolutely necessary ones. This will free up a sizeable chunk of resources, which can then be allocated to tasks/processes you are actively working on.
- To disable non-critical services, press Windows + S to open Search, type System Configuration > click on the relevant result > go to the Services tab > tick the Hide all Microsoft services checkbox > click on Disable all > click Apply and OK > click Restart in the confirmation prompt.

- To disable non-critical startup apps, press Ctrl + Shift + Esc to open Task Manager > go to the Startup apps tab > select any apps that read Enabled under the Status column > click Disable.

While disabling startup apps, if you find the Waves MaxAudio Service Application (WavesSvc64.exe) entry, don’t disable it. That will affect the audio output. If you inadvertently did, re-enable it. Also, if disabling any other startup app has adverse effects, you should immediately re-enable it!
5. Enable Efficiency Mode for non-critical processes
Windows has a built-in Efficiency Mode for certain processes that minimizes their resource consumption and ensures optimized resource allocation for tasks that you are actively working on. This way, it improves the responsiveness of active processes and helps make Windows faster.
When you are enabling Efficiency Mode for background processes, make sure to select the ones that are not critical but related to third-party apps. Windows, by default, greys out the Efficiency Mode option for core OS processes.
- To enable Efficiency Mode, press Ctrl + Shift + Esc to open the Task Manager > select a non-critical process from the list > click on Efficiency Mode near the top right > click OK in the confirmation prompt.

6. Scan the PC for malware and viruses
Malware and virus infection is another key reason behind the slow Windows PC performance. This happens because malware/viruses run several background processes that hog the system resources, be it the RAM, disk, or CPU, leaving little for active apps and core Windows processes. So, to speed up Windows, you must immediately detect and remove any virus/malware from the computer.
Besides being a resource hog, malware can compromise the privacy and security of a device, often sending data from the system to threat actors. New-age malware can also allow hackers to gain access to the computer’s microphone and webcam!
- To scan the PC for malware/viruses, press Windows + S to open Search > type Windows Security > click on the relevant result > select Virus & threat protection > click on Scan options > choose Full scan > click Scan now > wait for the malware scan to complete.

If any virus or threat is found and deleted/quarantined, you should see an immediate boost in Windows performance. In case nothing was detected, I recommend running another malware scan using a top-rated antivirus solution, preferably MalwareBytes, Avast, or Norton.
7. Free up storage space
If your Windows PC doesn’t have enough free storage, it’s bound to slow down. Experts recommend having at least 15-20% free space on the storage drive for optimal performance. Setting aside 15-20% free storage allows Windows to efficiently perform key operations and ensure proper defragmentation, when done.
- To free up storage on Windows, press Windows + S to open Search > type Disk Cleanup > click on the relevant result > select a drive > click OK > checkmark the file types to be deleted > click OK > again run Disk Cleanup and select the same drive > click on Clean up system files > checkmark the non-critical files types > click OK.

Disk Cleanup is a utility that is to be manually run each time. But you can always automate the process of clearing disk space by setting up Storage Sense. It’s a built-in feature that periodically checks the PC for leftover and non-critical files and automatically deletes them.
Also Read: Disk Cleanup vs Storage Sense
- To enable Storage Sense, press Windows + I to open Settings > go to System > click on Storage > scroll down, select Storage Sense > enable the toggle for it > configure the settings for automatic deletion of files.

Or if you have the Windows.old folder, deleting it could free up 25-30 GB instantly on the system drive.
Also Read: 3 Ways to Partition a Hard Drive or SSD in Windows
8. Adjust visual effects for best performance
One of the most effective ways to speed up an old Windows PC is to adjust visual effects for best performance. This method works because older hardware is often not able to render modern graphics, leading to a performance slowdown. Although on modern PCs, you won’t notice much of a difference. On the contrary, it will result in terrible visuals and animations!
- To configure visual effects for best performance, press Windows + S to open Search > type View advanced system settings > click on Settings under Performance > select Adjust for best performance > click OK to save the changes.

When you adjust visual effects for best performance, it disables most animations and transparency effects, allowing Windows to allocate more resources to the active processes.
9. Set a static wallpaper and reduce the number of desktop icons
If you have a live/dynamic wallpaper with changing visuals, it will slow down the PC and consume more power. Similarly, having a cluttered desktop (too many desktop icons) can lead to slower boot speed on older Windows PCs. To fix this and speed up Windows, move all infrequently used desktop icons to a new folder. As for the others, you can pin a few to the Start Menu or Taskbar.
- To set a static/still wallpaper on Windows, press Windows + I to open Settings > go to Personalization > click on Background > select Picture under Personalize your desktop > choose from one of the available static wallpapers, or click on Browse photos and pick one from the PC.

10. Turn off game mode
While Game Mode, enabled by default, is a useful feature for many seasoned gamers, it has often been found to affect the PC’s overall performance. When Game Mode is enabled, Windows deprioritizes non-gaming background processes and tasks during gameplay and allocates these additional resources to the active game. This may lead to results that are counterproductive for a few.
So, you should disable Game Mode and check for improvements. If there’s no noticeable boost in performance and you regularly play games on the device, re-enable the Game Mode.
- To turn off Game Mode in Windows, press Windows + I to open Settings > go to Gaming > click on Game Mode > disable the toggle for Game Mode.

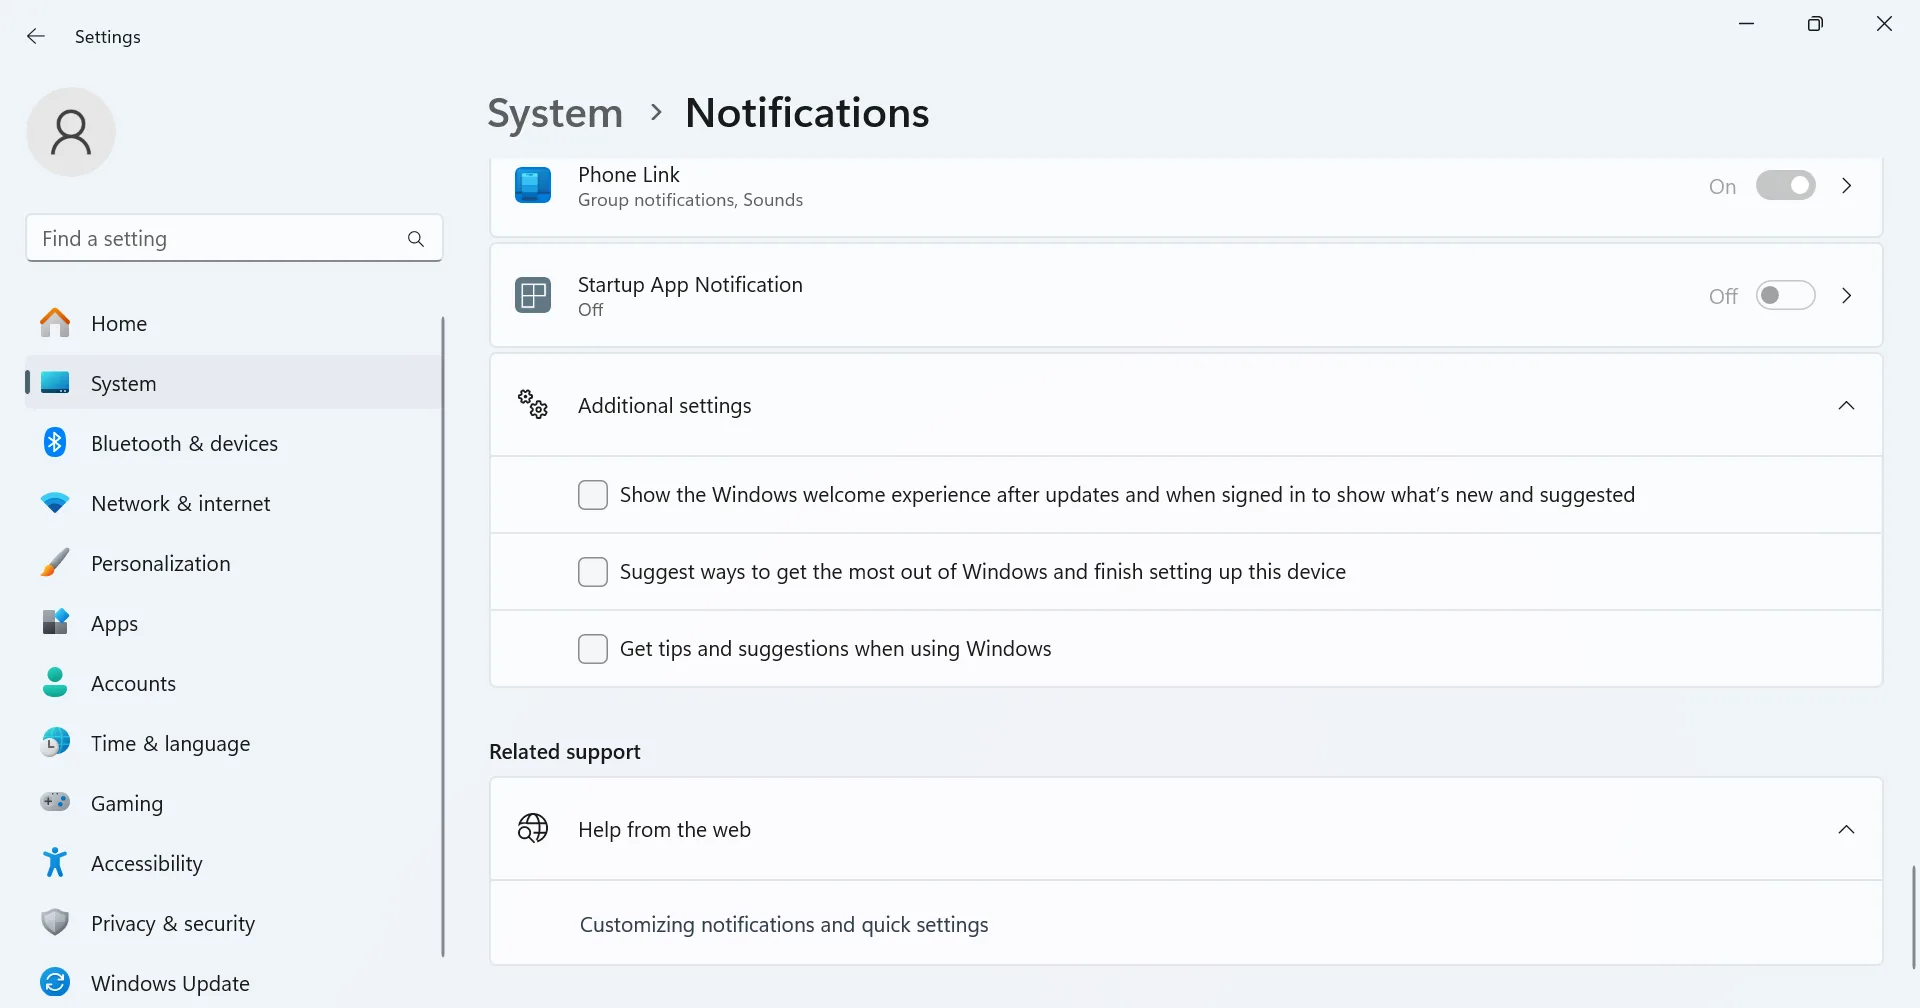
11. Disable Windows suggestions and notifications
If Windows is configured to send you frequent notifications or suggestions, it will slow down the computer. Remember, the key to speeding up Windows is to stop all additional, non-critical tasks and eliminate software conflicts. If you are able to achieve these two, you will enjoy a much faster performance, both on a new and old Windows PC!
- To disable notifications in Windows, press Windows + I to open Settings > go to System > click Notifications > disable the toggle for Notifications.

- To disable Windows suggestions and tips, scroll down in Notification settings > click on Show additional settings > untick the checkboxes for Show the Windows welcome experience after updates and when signed in to show what’s new and suggested, Suggest ways to get the most out of Windows and finish setting up this device, and Get tips and suggestions when using Windows.
12. Defragment the HDD (don’t do it for SSD)
If your PC has an HDD (Hard Disk Drive) as the storage device, performing defragmentation will boost performance. It helps when data stored on the drive fragments over time, and Windows has to spend more time fetching it for each file. When you defrag an HDD, the data packets for the same files are consolidated and stored close together physically for quick access.
However, for an SSD (Solid State Drive), defragmentation isn’t necessary since data is easily fetched regardless of its location. Frequently defragging an SSD can reduce its lifespan. When Windows detects an SSD on the PC, it prioritizes optimization over the defrag operation. So, you should never manually defrag an SSD!
- To defragment an HDD to speed up Windows, press Windows + S to open Search, type Defragment and Optimize Drives > select a drive from the list > click on Analyze to find out whether the drive needs defragmentation/optimization > if it does, click on Optimize.

13. Update all the drivers
While it’s not talked about enough, updating the drivers can significantly speed up Windows and make it run faster. This helps in three ways:
- Allows better relay of information between Windows and hardware
- Eliminates conflicts between Windows and installed driver version (if it’s buggy)
- Introduces new features and capabilities released by the developer
If you haven’t ever updated the drivers, there are multiple ways to do it. But in my experience, the OEM’s website serves as the best source for driver updates. Third-party tools don’t really work, and Windows updates often push newer driver versions way after they are officially released.
- To update the drivers, go to the manufacturer’s official website > search for your PC model > look for any driver updates > download the latest driver (.exe file) > run the setup to install the new driver version.
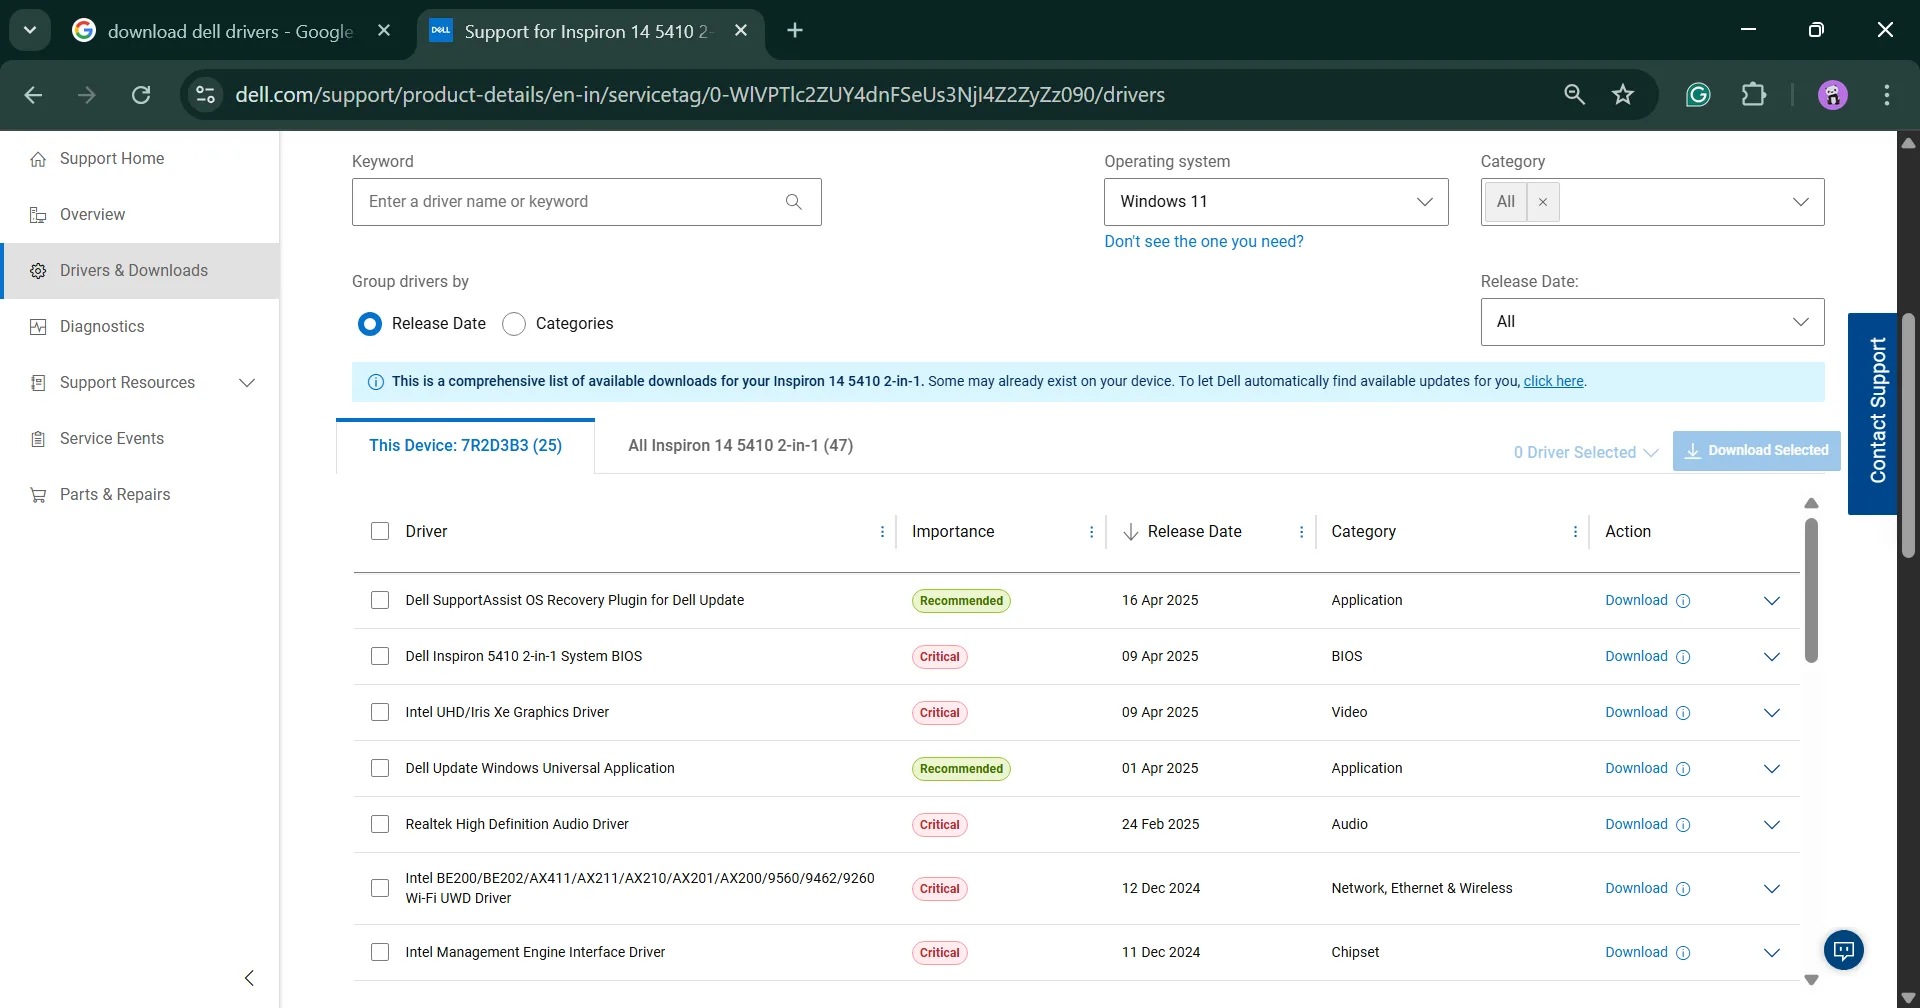
Many OEMs also integrate an auto-driver update tool that quickly scans the PC and recommends driver updates. If available, you could use that!
Also, while you are at it, update the network adapter’s driver, since that will speed up Google Chrome.
14. Increase the Virtual Memory
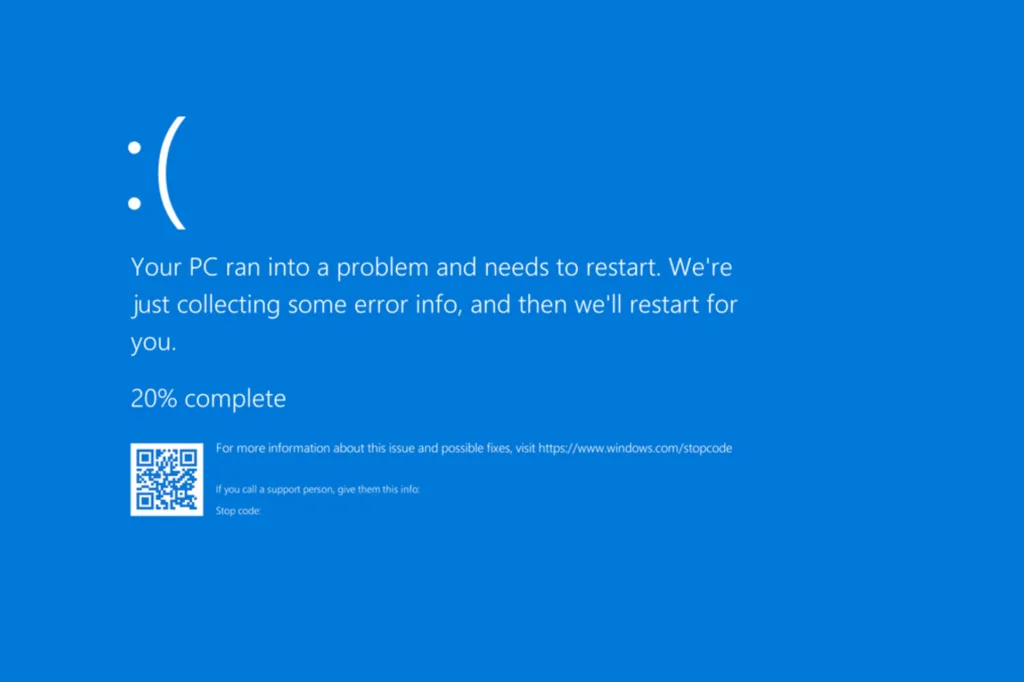
What happens when your PC starts running out of RAM? Initially, the performance will slow down, and if the RAM usage remains unchecked, active apps will start to crash, and you may even encounter a blue screen error. To avoid this situation, you have two options: add more physical RAM to the PC or increase the virtual memory. The former is more effective but costly, while the latter takes only a few minutes and is easy to set up.
Coming to what is virtual memory? Virtual memory, also called a page file, is a space on the HDD or SSD that works as an extension of the RAM. When virtual memory is available, Windows moves idle processes and tasks to it to free up the RAM, thus boosting Windows’ performance.
Also Read: Virtual Memory vs Physical Memory
- To increase virtual memory on the PC, press Windows + S to open Search > type View advanced system settings > click on Settings under Performance > go to Advanced tab > click Change under Virtual memory > uncheck Automatically manage paging files size for all drives at the top > choose Custom size > fill out the Initial size and Maximum size fields > click Set > click OK.

Coming to what’s the best virtual memory size, Microsoft recommends the following based on available physical RAM in the PC:
- Initial size: 1.5 x Physical RAM
- Maximum size: 3 x Physical RAM
So, if your PC has 8 GB RAM, the virtual memory configuration in Windows becomes:
- Initial size: 12 (1.5 x 8)
- Maximum size: 24 (3 x 8)
After you have increased the virtual memory, Windows should perform faster than before due to additional memory space on the storage drive!
Remember, virtual memory isn’t a replacement for RAM modules. There’s a significant difference in performance if we compare the two. That’s why Windows always moves idle processes to the virtual memory to free up RAM for the active tasks.
15. Set up ReadyBoost
ReadyBoost is a built-in Windows feature that uses a USB drive or SD card to increase the cache memory, allowing the OS to perform tasks much quicker, say editing large files. Again, ReadyBoost is not a replacement for a RAM upgrade, but a cost-effective alternative that will speed up Windows on older PCs with minimal hardware configuration.
To use ReadyBoost, you will need a USB flash drive or SD card with at least 500 MB of free storage and a high data transfer rate, say 3 MB/s. Although I would recommend using a fast USB3 flash drive with at least 1-2 GB of free space.
- To set ReadyBoost, connect the USB drive or SD card > press Windows + E to open the File Explorer > right-click on the USB drive > select Properties > go to the ReadyBoost tab > select Use this device > drag the slider underneath to allocate maximum space for ReadyBoost > click Apply and OK to save the changes.

Remember, ReadyBoost is not available on modern-day PCs that have an SSD or sufficient RAM for optimal resource allocations. Besides, Microsoft has removed the feature from Windows 11, starting with version 22H2.
So, if the ReadyBoost tab is missing on your Windows PC, I recommend not getting into it too much and skipping to the next method!
16. Check for dust accumulation in the hardware
Many of you might not know this, but like every other device, your computer, whether a desktop or laptop, needs regular cleaning to clear dust accumulation in the CPU fan. When the CPU fan is clogged with dust, it won’t run at its maximum speed, triggering a rise in the PC’s temperature, which will ultimately slow down the computer.
If you are unsure about the severity of dust accumulation, verify whether the system heats up while running resource-intensive tasks. In case it does, it’s time to remove the back casing and use a can of compressed air to clear dust particles lodged in the hardware components. Avoid using a wet cloth to wipe dust off the hardware.
Personally, I prefer using a CPU fan control software to increase or decrease the speed as needed. While that’s something Windows should manage, it isn’t very good at the job. For this purpose, you can use Argus Monitor or Fan Control.
17. Switch to performance-oriented hardware for RAM and disk
The two most important performance-oriented components on your PC are the storage drive and RAM. If your PC doesn’t have enough free space, it will slow down. If the RAM is running low, the PC will slow down. Even if you are using outdated RAM sticks with low speeds, the computer’s performance will be affected.
That’s why upgrading the hardware remains the most effective fix to speed up Windows on an old PC, be it upgrading the storage drive or adding more RAM.
If you remember, I earlier talked about a 10-year-old HP laptop running Windows 10. To speed it up, I upgraded its storage drive from HDD to SSD. The benefits of the latter are well known, but I wasn’t expecting that high a performance boost. It was massive!
Now, let me share with you an expert tip. If you are using an old laptop, it most likely has a dedicated CD drive. Honestly, these have gotten irrelevant, of late. All major software and games are available for download on the web. So, what you can do is remove that CD drive and install an additional SSD with 128 GB storage, which will cost you $30-$50. Now, install Windows on the SSD, making it the system drive, while the existing HDD can be used to store personal files.
This way, you won’t have to shell out a lot of money on an SSD while reaping maximum benefits. An HDD does a decent job at storing personal files, while installing Windows on an SSD will improve boot time and the overall OS performance!
As for the RAM, find out what the maximum limit is for your computer. You can check the maximum RAM limit by running the “wmic memphysical get maxcapacity” command (output is in KBs, must be converted to GBs). For modern-day PCs running 64-bit Windows, it can be anywhere between 16 GB and 128 GB, while older computers with 32-bit Windows have a 4 GB RAM limit.

Now, if the RAM limit comes out as 16 GB, you must have that much. It’s the bare minimum these days, given the level of resource consumption of modern-day applications. But, I don’t recommend hitting the maximum RAM limit when it’s 64 GB or 128 GB. In that case, add only what’s required, say 32 GB, unless you are a seasoned gamer or software developer.
As for the RAM type, I recommend DDR4, which is faster than older DDR3 and more cost-effective than the latest, DDR5. The frequency of the DDR4 RAM type ranges between 2133MHz and 3200MHz, which is more than decent for running resource-intensive applications and modern-day games. Although, if you have the budget for it, DDR5 is the best choice!
Those were the most effective ways to speed up Windows, both on an old PC and a completely new setup. I haven’t listed updating Windows as a tip because I am assuming you already know that. If not, it’s vital that your PC stays up-to-date with the latest Windows version. This doesn’t just help boost performance but is key to improved security. Outdated Windows versions often have vulnerabilities that can be exploited by hackers!
Before you leave, learn how to fix corrupted drivers on Windows to ensure effective relay of information between the OS and the hardware.
Which tip to speed up Windows worked best for you? Share with our readers in the comments section!

With over five years of experience in the tech industry, Kazim excels at simplifying complex topics, making them accessible to tech enthusiasts and general readers alike. He has contributed to several renowned publications worldwide, including WindowsReport and Allthings.how, bringing insightful coverage of key developments in the field.
Kazim has extensively covered the Windows ecosystem, from the early days of Windows 7 to Windows 11. Unlike many in the field, he’s optimistic about Windows 11, calling it the most user-oriented iteration to date.
When he’s not writing, you’ll find Kazim planning weekend getaways or diving into tech verticals beyond his expertise.